Most SharePoint environments today are using NTLM (the default) as the authentication protocol. NTLM authentication is a challenge-response scheme, consisting of three messages, commonly referred to as Type 1 (negotiation), Type 2 (challenge) and Type 3 (authentication). For more information on NTLM go to http://en.wikipedia.org/wiki/NTLM as discussion over NTLM and its working in out of scope for this post.
The problem with setting up Web Proxies (Paros, Burp etc) is that they work fine with other types of authentication (Custom, Basic) but where there's NTLM is used the chain breaks between the proxy and the server resulting in non function of the application.
As soon as the proxy wants to connect to the server it gets the following '401:Unauthorized' response:
HTTP/1.1 401 Unauthorized Server: Microsoft-IIS/7.5 WWW-Authenticate: NTLM X-Powered-By: ASP.NET MicrosoftSharePointTeamServices: 14.0.0.4762 Date: Sat, 04 Sep 2010 06:38:22 GMT Content-Length: 0
You can't capture requests/responses through the proxies at all. I was also facing the same problem. Ronnie suggested me to use a tool which will sit between the proxy and application server. Which will handle all the NTLM communications between the proxy and the server...cool! The tool is called NTLMaps and can be downloaded here: http://ntlmaps.sourceforge.net/
'NTLM Authorization Proxy Server' (NTLMAPS) is a proxy software that allows you to authenticate via an MS Proxy Server using the proprietary NTLM protocol
Now the scenario was like this:
 How to setup the chain:
1. Set the proxy server address in your browser to any port, lets say-localhost:8080
2. Set the Local proxy setting in the Web Proxy (Paros) as the same as you did for the browser so that the can communicate with each other on same port- localhost:8080
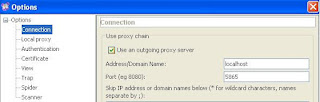
 3. In Connection section of the Paros set the Outgoing proxy port no. as 5865. By default, the NTLMAPS tool runs on the same port. Now Paros will forward all requests obtained by browser to NTLMAPS at 5865.
4. Now start the NTLMAPS tool:
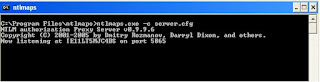
5. Now go to your browser and access the application. You will be able to capture request -response as usual as if you were working with custom authentications! The tool does the NTLM communications for you in the background without your knowing. You can see the communications also on the screen:

Happy Pentesting ! :)
The problem with setting up Web Proxies (Paros, Burp etc) is that they work fine with other types of authentication (Custom, Basic) but where there's NTLM is used the chain breaks between the proxy and the server resulting in non function of the application.
As soon as the proxy wants to connect to the server it gets the following '401:Unauthorized' response:
HTTP/1.1 401 Unauthorized Server: Microsoft-IIS/7.5 WWW-Authenticate: NTLM X-Powered-By: ASP.NET MicrosoftSharePointTeamServices: 14.0.0.4762 Date: Sat, 04 Sep 2010 06:38:22 GMT Content-Length: 0
You can't capture requests/responses through the proxies at all. I was also facing the same problem. Ronnie suggested me to use a tool which will sit between the proxy and application server. Which will handle all the NTLM communications between the proxy and the server...cool! The tool is called NTLMaps and can be downloaded here: http://ntlmaps.sourceforge.net/
'NTLM Authorization Proxy Server' (NTLMAPS) is a proxy software that allows you to authenticate via an MS Proxy Server using the proprietary NTLM protocol
Now the scenario was like this:
 How to setup the chain:
1. Set the proxy server address in your browser to any port, lets say-localhost:8080
2. Set the Local proxy setting in the Web Proxy (Paros) as the same as you did for the browser so that the can communicate with each other on same port- localhost:8080
 3. In Connection section of the Paros set the Outgoing proxy port no. as 5865. By default, the NTLMAPS tool runs on the same port. Now Paros will forward all requests obtained by browser to NTLMAPS at 5865.
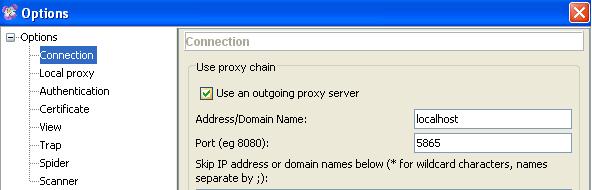
4. Now start the NTLMAPS tool:

5. Now go to your browser and access the application. You will be able to capture request -response as usual as if you were working with custom authentications! The tool does the NTLM communications for you in the background without your knowing. You can see the communications also on the screen:

Happy Pentesting ! :)
Comments